"Sunny 16 Rule" and EXPOSURE Table (Light Value)
I finally understood how that thing works and I wish to share it with a reader who might feel stuck at the same place I was until yesterday or so.
This post mentions the Rollei because it's the camera I have and love. My Canon AE-1 or your camera will follow the same science !
The reason I revisited this subject is a post on a forum where a guy asked for help reading the table BUT a shed load of "connoisseurs" flooded the poor guy with their own confusions and doubts. Things like: 'it doesn't really work' or 'it is supposed to be used together with a light meter' or 'that si from the days (before digital) when photographers could not get true esimates of light value and exposure and had to guess' (almost true) or even 'here is the link to a Rollei manual - it tells you all you need to know. Period' (I wonder if the guys knew it, really.....prob not....).
So.....you've got yourself a Rollei? What the heck is that table with weird numbers and pictures on the back?!?

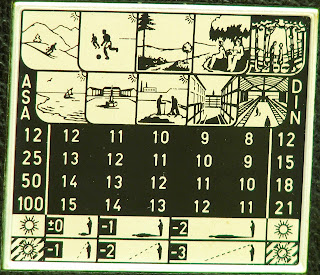
This is what I talk about:
Now MY Rollei is the Rolleicord Va (almost 100% absolute sure about that :) and my table only goes up to ASA 100. I have a manual showing up to ASA 800 but in which ASA 100 is missing. What you do? You read inbetween. I see numbers ASA 50 and 200. 100 is exactly in between.
For more on rolleis go to rolleiclub.com
Now let's decryptograph the table itself, shall we! Happy time
First thing: DIN is a very old film sensitivity scale. But ASA is the same as ISO. So, if you know what ISO means, stick to the ASA side and you'll need no convertion at all.
Take a good look at the table and its figures. It has 10 big scene pictures on the top two rows; 10 small pictures on the bottom two rows (with a picture of the sun shining on the top one on each side and, on each side, a pic of the sun overcast....looks like it's raining though; and in the middle a dense black area with white numbers sided by the ASA (ISO) values. The dense area is the EV (Exposure Value) matrix!
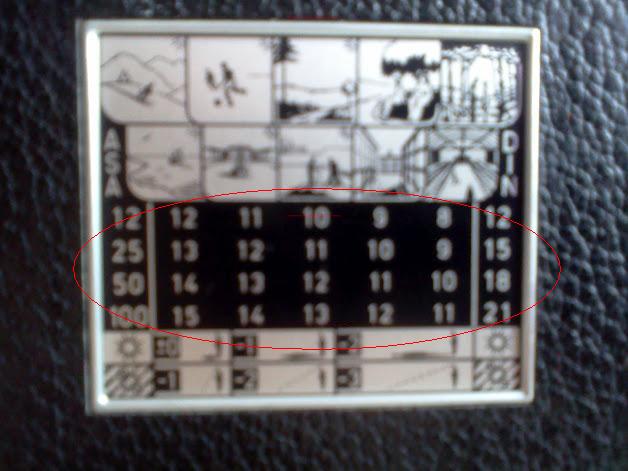
Breaking it down to pieces - red circles below
TOP COUPLED PICTURES (BIG SCENES): Determining best EV for composition quickly

In the pic above you'll see five (5) sets of two pictures, one on top of the other. The idea here is to tell you the best average EV (check my preceeding blog post) for a given scene and light.
As explained, we need to evaluate the light spreading over our subject plus the shades coming from it - if any.
Let's first call each couple scenes (one on top of the other) by letters A to E. There are, therefore, 5 sets of two pictures (scenes) :: A, B, C, D, and E.
A: (up) High Mountains without foreground - (down) Open beach. That is very brightly light open places, snow, sand, reflexions etc
B: (up) Sport scenes, wide lawns open spaces - (down) Bright streets and squares, Parkings, Parks, wide concrete areas, Open Landspaces.
C: (up) Landscapes WITH foreground - (down) Groups in the open.
D: (up) Groups in shade - (down) Street scenes with shade. Bright alleys.
E: (up) Groups under trees or lightly shaded subjects - (down) Groups in glassroofed halls, Galleries, Trains station (well lit, no deep shade areas).
EVALUATING SHADE:

Can you see that the first row has a sun picture on each side, while the second has an overcast sun (though it looks like rain! lol) ?
Those are the SHADOW values, to be adjusted with the light values.
Upper Row: +0 -1 -2
Lower Row: -1 -2 -3
Up row shades (shape): dark & short dark & medium\same length dark & long
Shades in a sunny day: dark, distinct, sharp and with edges easily noticeable
Shades in overcast day: varying degrees of softness to barely visible or, at the farthest spectrum, Absent (remember last post and the quick Sunny 16 table!). That can be seem in the lower row. Shades are always almost non-visible.
Example: It's sunny, dark and edgy short shades. EV -0. But let's say it's late in the afternoon and the shades, you notice, have grown very long, longer than the object itself...then do EV -2 (15 becomes 13).
Or even, it's overcast but you see no shades, and it's very bright. Do -1 EV (15 becomes 14).
Remember to check that on the next sunny or overcast day. Even today, when writing this blog, I had a very gray, heavily overcast day. Although it was extremely bright outside, there was NO SHADOW at all. Inside the flat, with the bright light coming into the window, there were shades - long and barely visible. What does that mean: for an outside subject I choseF5.6 - 1/125 (EV 12 = -3EV) and for the inside F4 - 1/4 (EV 6 = -9EVs). Worked nicely.
EV SCALE itself - How to use the Rollei table:
Now adding up the two information above and using it in the real world.

You'll now match (cross) your ISO with the scene you are shooting, adding the EV shade modifier if applicable.
Ok so you are shooting a football match, it is sunny, no big deal of clouds. The players have their dark shades clearly noticeable. The shades edges are sharp and also about their heights. Which scene picture are we talking about?
Resp: B, upper row.
So we know that we need to take the EV values (numbers) directly below the scene. They are 11, 12, 13 and 14 BUT your ISO is 100, so your base EV is only one, is the 14 --- below the picture and beside the ASA 100. And since the shadows are dark and a bit long (we might infer it's in the afternoon) the modifier is -1 EV. The resulting EV is then 14-1 = 13 !
What do we do with that!?! Very simple.....
Recap that the Sunny 16 "straight" is only a starting point which is F16 - 1/ISO - 15 EV (EV 15 == +/-ZERO EV compensation under the Sunny 16 Rule ! EV 15 is the starting point, sunny bright, midtone subject), then;
Set your Rollei like this: F/16 aperture - 1/ISO shutter speed on the coupled knob and on the diaphragm knob (the one with the red numbers) find the number 15.......
You've set Sunny 16 on your Rollei!!
If you don't have a Rollei go on, the idea can be modified to other cameras (even digital). Especially if you use the EV and LV Chart.
Back to the examples:
EV 13 is -2 EV or + 2 stops of light needed in relation to EV 15. Move the EV knob up until it's set to 13. Now look at the coupled knob and check what the Aperture/Shutter says now......
it says1/125 shutter speed BUT now the aperture is set at F8 ! And how many stops is that? Two!
You opened up for twice more light (F16->11->8) keeping the same shutter speed.
With that you correctly exposed the scene starting from Sunny 16 and reading the table on the back of your Rollei.
Let's analyse if the table makes sense...if it correctly exposes the frame by means of our old friends: charts EV and LV.
I want to take a pic of my friends. We are quite close to each other and amisdt many trees, like in a park, with some shade (lightly shaded). I can say now that this scene is letter "E". And lets say it's a couldy day outside. I can now expect that the correct EV compensation for this shot will be around (11-1=10 EV) under the Sunny 16; and that is shooting F4 @ 1/60s ! Checking that against the charts EV 11 is "open shade" which looks right, and the extra +1 EV adds to the fact that the subjects are in the shade. Furthermore EV 10 is also F4 - 60s
The chart also tells us we might use F2.8 - 125s or F8 - 15s and get the exact same exposure. Line "10".
The EV Math: 15 - 4 full stops = 11. Minus 1 stop (or +1 EV compensation to make things brighter) = 10
Go back to the Quick Sunny Day table and you'll see that it also tells you should use F4.
All methods lead to a same result. You may add or subtract to get better exposures. You may even choose different settings but the base Sunny 16 Rule is all set on your Rollei, ready to help you in a blink of the eye!
How nice is that?!
Another thing. Once you have set the diaphragm ring (red numbers knob) to your chosen EV the F-number/Speed coupled knob will show you all different setings you may choose from keeping the same exposure value.
Example: Set the EV number to 7. Then move the coupled knob up and down and you will get all possible same exposure compositions:
F16 - Bulb
F11 - 1"
F8 - 1/2
F5.6 - 1/4
F4 - 1/8
Hope I've been of some help.
If you use the Rollei setting please let me know of your experiences and also help me add to my Charts different situations and light conditions.
cheers
I finally understood how that thing works and I wish to share it with a reader who might feel stuck at the same place I was until yesterday or so.
This post mentions the Rollei because it's the camera I have and love. My Canon AE-1 or your camera will follow the same science !
The reason I revisited this subject is a post on a forum where a guy asked for help reading the table BUT a shed load of "connoisseurs" flooded the poor guy with their own confusions and doubts. Things like: 'it doesn't really work' or 'it is supposed to be used together with a light meter' or 'that si from the days (before digital) when photographers could not get true esimates of light value and exposure and had to guess' (almost true) or even 'here is the link to a Rollei manual - it tells you all you need to know. Period' (I wonder if the guys knew it, really.....prob not....).
So.....you've got yourself a Rollei? What the heck is that table with weird numbers and pictures on the back?!?

This is what I talk about:

Now MY Rollei is the Rolleicord Va (almost 100% absolute sure about that :) and my table only goes up to ASA 100. I have a manual showing up to ASA 800 but in which ASA 100 is missing. What you do? You read inbetween. I see numbers ASA 50 and 200. 100 is exactly in between.
For more on rolleis go to rolleiclub.com
Now let's decryptograph the table itself, shall we! Happy time
First thing: DIN is a very old film sensitivity scale. But ASA is the same as ISO. So, if you know what ISO means, stick to the ASA side and you'll need no convertion at all.
Take a good look at the table and its figures. It has 10 big scene pictures on the top two rows; 10 small pictures on the bottom two rows (with a picture of the sun shining on the top one on each side and, on each side, a pic of the sun overcast....looks like it's raining though; and in the middle a dense black area with white numbers sided by the ASA (ISO) values. The dense area is the EV (Exposure Value) matrix!
Breaking it down to pieces - red circles below
TOP COUPLED PICTURES (BIG SCENES): Determining best EV for composition quickly

In the pic above you'll see five (5) sets of two pictures, one on top of the other. The idea here is to tell you the best average EV (check my preceeding blog post) for a given scene and light.
As explained, we need to evaluate the light spreading over our subject plus the shades coming from it - if any.
Let's first call each couple scenes (one on top of the other) by letters A to E. There are, therefore, 5 sets of two pictures (scenes) :: A, B, C, D, and E.
A: (up) High Mountains without foreground - (down) Open beach. That is very brightly light open places, snow, sand, reflexions etc
B: (up) Sport scenes, wide lawns open spaces - (down) Bright streets and squares, Parkings, Parks, wide concrete areas, Open Landspaces.
C: (up) Landscapes WITH foreground - (down) Groups in the open.
D: (up) Groups in shade - (down) Street scenes with shade. Bright alleys.
E: (up) Groups under trees or lightly shaded subjects - (down) Groups in glassroofed halls, Galleries, Trains station (well lit, no deep shade areas).
EVALUATING SHADE:

Can you see that the first row has a sun picture on each side, while the second has an overcast sun (though it looks like rain! lol) ?
Those are the SHADOW values, to be adjusted with the light values.
Upper Row: +0 -1 -2
Lower Row: -1 -2 -3
Up row shades (shape): dark & short dark & medium\same length dark & long
Shades in a sunny day: dark, distinct, sharp and with edges easily noticeable
Shades in overcast day: varying degrees of softness to barely visible or, at the farthest spectrum, Absent (remember last post and the quick Sunny 16 table!). That can be seem in the lower row. Shades are always almost non-visible.
Example: It's sunny, dark and edgy short shades. EV -0. But let's say it's late in the afternoon and the shades, you notice, have grown very long, longer than the object itself...then do EV -2 (15 becomes 13).
Or even, it's overcast but you see no shades, and it's very bright. Do -1 EV (15 becomes 14).
Remember to check that on the next sunny or overcast day. Even today, when writing this blog, I had a very gray, heavily overcast day. Although it was extremely bright outside, there was NO SHADOW at all. Inside the flat, with the bright light coming into the window, there were shades - long and barely visible. What does that mean: for an outside subject I choseF5.6 - 1/125 (EV 12 = -3EV) and for the inside F4 - 1/4 (EV 6 = -9EVs). Worked nicely.
EV SCALE itself - How to use the Rollei table:
Now adding up the two information above and using it in the real world.
You'll now match (cross) your ISO with the scene you are shooting, adding the EV shade modifier if applicable.
Ok so you are shooting a football match, it is sunny, no big deal of clouds. The players have their dark shades clearly noticeable. The shades edges are sharp and also about their heights. Which scene picture are we talking about?
Resp: B, upper row.
So we know that we need to take the EV values (numbers) directly below the scene. They are 11, 12, 13 and 14 BUT your ISO is 100, so your base EV is only one, is the 14 --- below the picture and beside the ASA 100. And since the shadows are dark and a bit long (we might infer it's in the afternoon) the modifier is -1 EV. The resulting EV is then 14-1 = 13 !
What do we do with that!?! Very simple.....
Recap that the Sunny 16 "straight" is only a starting point which is F16 - 1/ISO - 15 EV (EV 15 == +/-ZERO EV compensation under the Sunny 16 Rule ! EV 15 is the starting point, sunny bright, midtone subject), then;
Set your Rollei like this: F/16 aperture - 1/ISO shutter speed on the coupled knob and on the diaphragm knob (the one with the red numbers) find the number 15.......
You've set Sunny 16 on your Rollei!!
If you don't have a Rollei go on, the idea can be modified to other cameras (even digital). Especially if you use the EV and LV Chart.
Back to the examples:
EV 13 is -2 EV or + 2 stops of light needed in relation to EV 15. Move the EV knob up until it's set to 13. Now look at the coupled knob and check what the Aperture/Shutter says now......
it says1/125 shutter speed BUT now the aperture is set at F8 ! And how many stops is that? Two!
You opened up for twice more light (F16->11->8) keeping the same shutter speed.
With that you correctly exposed the scene starting from Sunny 16 and reading the table on the back of your Rollei.
Let's analyse if the table makes sense...if it correctly exposes the frame by means of our old friends: charts EV and LV.
I want to take a pic of my friends. We are quite close to each other and amisdt many trees, like in a park, with some shade (lightly shaded). I can say now that this scene is letter "E". And lets say it's a couldy day outside. I can now expect that the correct EV compensation for this shot will be around (11-1=10 EV) under the Sunny 16; and that is shooting F4 @ 1/60s ! Checking that against the charts EV 11 is "open shade" which looks right, and the extra +1 EV adds to the fact that the subjects are in the shade. Furthermore EV 10 is also F4 - 60s
The chart also tells us we might use F2.8 - 125s or F8 - 15s and get the exact same exposure. Line "10".
The EV Math: 15 - 4 full stops = 11. Minus 1 stop (or +1 EV compensation to make things brighter) = 10
Go back to the Quick Sunny Day table and you'll see that it also tells you should use F4.
All methods lead to a same result. You may add or subtract to get better exposures. You may even choose different settings but the base Sunny 16 Rule is all set on your Rollei, ready to help you in a blink of the eye!
How nice is that?!
Another thing. Once you have set the diaphragm ring (red numbers knob) to your chosen EV the F-number/Speed coupled knob will show you all different setings you may choose from keeping the same exposure value.
Example: Set the EV number to 7. Then move the coupled knob up and down and you will get all possible same exposure compositions:
F16 - Bulb
F11 - 1"
F8 - 1/2
F5.6 - 1/4
F4 - 1/8
Hope I've been of some help.
If you use the Rollei setting please let me know of your experiences and also help me add to my Charts different situations and light conditions.
cheers
I agree with your conclusions and looking forward to your coming updates. Thanks for sharing.
ResponderExcluirRio de janeiro apartment
thanks! not a lot of people seems to take an interest in these old school b&w techy stuff.
ResponderExcluir